
Wraparound Garden Design: Connecting Front, Side, and Back
Design a wraparound garden with flow and purpose. Connect front, side, and back spaces with a unified palette, screening utility areas, and seamless transitions.
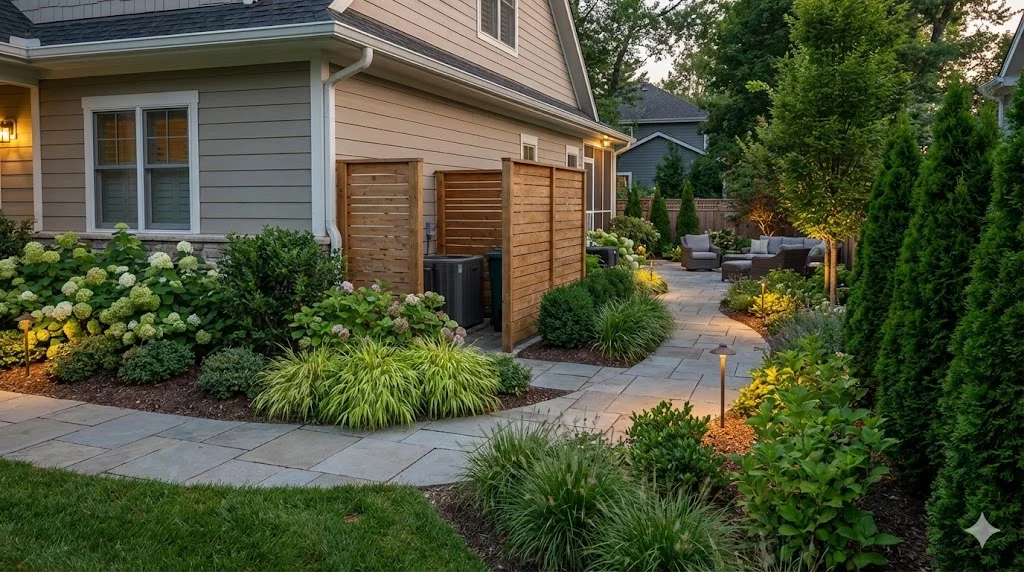
A wraparound garden is one of the most rewarding layouts a garden owner can inherit, yet it is also one of the most misunderstood. Where a typical plot concentrates all its ambition in the back garden and treats the front as little more than a drive and a dustbin store, a garden that wraps around the house offers something far richer: the chance to create a continuous journey from street to sanctuary, with each zone playing a distinct role while belonging unmistakably to the same design.
The challenge is that most wraparound plots are designed in fragments. The front gets one treatment, the side passage is forgotten entirely, and the back garden becomes an island with no visual relationship to anything beyond the patio doors. The result is three separate gardens rather than one coherent landscape. Getting it right means thinking about flow, sight lines, materials, and planting as a single connected system -- and the rewards are well worth the effort.
Why Flow Matters More Than Any Single Feature
The defining quality of a successful wraparound garden design is movement. Not just physical movement along a path, but the visual and emotional sense that one space leads naturally into the next. A garden connecting front to back should feel like turning the pages of a well-structured story, where each new area arrives as a pleasant surprise yet feels inevitable in hindsight.
Flow depends on three things working together. First, a path or route that draws you onward rather than forcing you to retrace your steps. Second, repeated elements -- a material, a colour, a signature plant -- that act as threads stitching the zones together. Third, moments of transition that signal you are moving from one character of space to another without slamming the door on what came before.
When all three are in place, even a modest wraparound plot feels generous and purposeful. Without them, you simply have neighbours' gardens bolted together.
Creating a Unified Plant Palette
One of the quickest ways to make a wraparound garden feel disjointed is to choose entirely different planting for each zone. A tropical border at the front, a cottage herbaceous mix down the side, and a minimalist gravel garden at the back might each be lovely on their own, but experienced together they feel like a horticultural identity crisis.
A unified palette does not mean planting the same thing everywhere. It means selecting a family of plants that share a visual language -- a common colour temperature, a similar scale of foliage, or a repeated structural form -- and deploying them in different combinations around the house.
Start by choosing three to five anchor plants that will appear in at least two of the three zones. These might include:
- A structural evergreen such as Pittosporum tenuifolium or Taxus baccata (yew), clipped to different heights as needed.
- A signature flowering shrub like Hydrangea paniculata 'Limelight' or Rosa 'Kew Gardens', used as a specimen at the front and repeated in a group at the back.
- A ground-cover thread such as Geranium 'Rozanne' or Erigeron karvinskianus, allowed to self-seed along path edges in every zone.
- An ornamental grass -- Hakonechloa macra in shade or Stipa tenuissima in sun -- that provides a consistent texture and movement.
Around these anchors, you can introduce zone-specific supporting plants that suit the particular microclimate and function of each area. The anchors provide the continuity; the supporting cast provides variety.
Understanding Microclimates Around the House
A wraparound garden, by definition, wraps around at least three sides of a building. That means it includes aspects facing in different directions, each with its own light levels, wind exposure, and soil conditions. Treating the entire garden as a single microclimate is a recipe for failure.
South- and west-facing sections receive the most sun and warmth. These are ideal for sun-loving perennials, Mediterranean herbs, and any plants that need good light to flower well. They also dry out fastest, so consider mulching generously and choosing drought-tolerant species where irrigation is limited.
North- and east-facing sections are shadier and often cooler, particularly in winter. Shade-tolerant shrubs like Sarcococca confusa (sweet box), ferns such as Dryopteris erythrosora, and woodland perennials like Brunnera macrophylla 'Jack Frost' thrive here. These areas often retain moisture longer, which can be an advantage or a problem depending on drainage.
Side passages tend to form wind tunnels, funnelling gusts between the house wall and the boundary. They also receive limited direct light. Tough, tolerant plants -- evergreen ferns, Fatsia japonica, climbing hydrangea (Hydrangea anomala subsp. petiolaris) -- cope best with these conditions.
Understanding these differences and planting accordingly, while still drawing on your unified palette, is what separates a thoughtful wraparound design from one that simply happens to occupy three sides of a house.
Screening Utility Areas Without Breaking the Flow
Every home has functional necessities that need to live somewhere: bins, recycling, compost heaps, oil tanks, gas meters, air-conditioning units, and drying lines. In a conventional garden, these get pushed to the side passage or tucked behind the garage where they are out of sight from the back garden but visible from every other angle. In a wraparound garden, there is no hidden angle -- every zone is part of the experience.
The solution is purposeful screening that conceals without creating dead ends. A slatted timber screen stained to match your fencing or decking can hide a bin store while allowing air to circulate. A narrow evergreen hedge of Prunus lusitanica (Portuguese laurel) or Ilex crenata provides year-round cover and can be maintained at whatever height suits the sight line.
For larger items like oil tanks, consider a three-sided enclosure with a living green wall panel or climbing plants on a wire frame. Trachelospermum jasminoides (star jasmine) on south-facing walls or Hydrangea anomala subsp. petiolaris on shadier aspects both provide dense coverage and seasonal interest.
The key principle is that screening should use materials and plants that already appear elsewhere in the garden. A screen that looks like it belongs to the garden's design vocabulary feels intentional; one built from leftover materials feels like an apology.
The Side Passage as a Connecting Experience
The side passage is the most neglected space in British gardens. Typically narrow -- often just 90 centimetres to 1.5 metres wide -- it is treated as a service corridor: a place to wheel bins, store ladders, and hurry through on the way to the back garden. In a wraparound garden design, the side passage is not a corridor. It is a transition space, and it deserves design attention equal to any other zone.
Think of it as a garden in miniature. Narrow does not mean empty. A well-chosen climber on the house wall, underplanted with shade-tolerant ground cover, transforms a bare alley into a green tunnel. Train wires horizontally at 30-centimetre intervals up the wall and plant Trachelospermum jasminoides, Clematis armandii, or an espaliered Pyracantha to create living architecture.
Underfoot, replace cracked concrete with permeable paving or gravel over a weed membrane. If the passage is wide enough, set stepping stones into ground-cover planting -- Soleirolia soleirolii (mind-your-own-business) or Sagina subulata (pearlwort) -- to give the sense of walking through a garden rather than along a utility route.
Lighting matters here. A narrow passage can feel unwelcoming after dark. Recessed LED step lights or a low-voltage strip along the base of the wall provide safety and atmosphere without cluttering the space.
For more ideas on making the most of these overlooked strips, see our guide to side yard garden design.
Transitions From Public to Private
A wraparound garden moves through a clear gradient of privacy. The front is the most public zone, visible to neighbours and passersby. The side passage is semi-private, glimpsed from the street but not fully exposed. The back garden is the most private, screened by the house itself and by boundary planting.
Good design acknowledges and reinforces this gradient. At the front, planting is generous but open, inviting the eye in without revealing everything. Low hedges, open-structured shrubs, and flowering borders create a welcoming atmosphere. We explore this in more detail in our article on front yard garden design and curb appeal.
As you move into the side passage, enclosure increases. The walls of the house and the boundary fence or wall create a sense of intimacy. Planting here can afford to be denser, with overhead elements -- arches, pergola beams, trained climbers -- that lower the visual ceiling and signal a shift in atmosphere.
Arriving in the back garden should feel like a release. After the compression of the side passage, the relative openness of the rear space feels expansive, even if the back garden is not particularly large. This contrast is a powerful design tool. If you can arrange for the first view of the back garden to be a framed glimpse through an arch or a gap in planting rather than a sudden, full reveal, the sense of arrival becomes even stronger.
Path Continuity and Material Choices
A continuous path is the backbone of any garden connecting front to back. The material you choose for this path is one of the most important design decisions in a wraparound garden, because it is the single element that physically links every zone.
Choose one primary paving material and use it throughout. Natural stone, brick, or high-quality porcelain pavers all work well. The important thing is consistency. If the front path is York stone, the side passage should be York stone, and the back patio should be York stone -- or at the very least, a material that sits comfortably alongside it.
Where budget is a concern, you can use the premium material for the main path and a complementary but less expensive material for secondary areas. Gravel in a matching tone, for instance, can fill wider areas in the back garden while the stone path weaves through as a continuous thread.
Path width should vary according to zone. At the front, a generous width of at least 1.2 metres (4 feet) feels welcoming. Through the side passage, a narrower path of 60 to 90 centimetres is practical and helps create that sense of compression before the release into the back garden. In the rear, the path can widen again into a terrace or patio.
If you are planning your layout digitally, mapping the path first and building the planting around it ensures continuity is locked in from the start.
A Unifying Colour Scheme
Colour is one of the most powerful tools for making a wraparound garden feel like a single, coherent space. A disciplined colour scheme does not mean monotony -- it means choosing a deliberate range and sticking with it.
Select a primary palette of two or three flower colours plus a foliage tone. For example:
- Warm scheme: Soft apricot, cream, and warm pink flowers with bronze or copper foliage accents.
- Cool scheme: Lavender, white, and silver-blue flowers with grey-green or glaucous foliage.
- Bold scheme: Deep magenta, rich purple, and lime green flowers with dark green structural planting.
Repeat your chosen palette in every zone. The specific plants will change to suit the microclimate -- a sun-loving Salvia at the front might be replaced by a shade-tolerant Astilbe in a similar colour at the side -- but the overall impression remains consistent. This consistency is what allows the eye to read the garden as one continuous space rather than a series of unrelated rooms.
Hardscape colours should support the planting palette. Warm-toned stone suits warm planting schemes; cool grey pavers complement cooler palettes. Even the colour of fencing, stain, or rendered walls plays a role in the overall impression.
Bringing It All Together: Your Action Plan
Designing a wraparound garden is a larger project than tackling a single zone, but the principles are straightforward. Here is a practical sequence to follow:
Walk the full circuit. Before you sketch anything, walk slowly around the entire perimeter of the house, noting sun exposure, wind direction, existing features worth keeping, and problem areas that need screening. Do this at different times of day.
Map your microclimates. Mark which sections are sunny, shady, sheltered, or exposed. This determines your planting choices more than any style preference.
Choose your path material. Decide on one primary surface that will connect all three zones. Lay this decision first; everything else follows from it.
Select your anchor plants. Pick three to five species that will recur throughout the garden to stitch the zones together visually.
Define your colour palette. Commit to two or three flower colours and a foliage tone, then select plants within that range for each microclimate.
Screen utility areas. Plan bin stores, compost, and services early so they can be integrated into the design rather than awkwardly bolted on later.
Design the transitions. Give special attention to the moments where one zone becomes another -- an arch, a change of level, a narrowing of the path -- to create a sense of journey.
Light the side passage. This often-dark corridor needs practical and atmospheric lighting to feel like part of the garden after sunset.
A wraparound garden is a rare privilege. Most garden owners would love more planting space, and you have it on three sides. By treating the entire perimeter as a single, flowing design -- with consistent materials, a unified plant palette, thoughtful screening, and deliberate transitions -- you transform a collection of leftover strips into a garden that genuinely wraps your home in green.
For a broader perspective on designing gardens of every shape and proportion, visit our pillar guide on garden design for any space.
Garden Design Team
Expert garden designers sharing tips, inspiration, and practical advice for creating beautiful outdoor spaces.
Explore professional garden design
Scapiera is a paid professional garden-design application. See plans for included capabilities and availability.
Join the waitlistRelated articles
Backyard Garden Design: Creating Your Outdoor Sanctuary
Design a backyard that works as an outdoor living space. Zoning for dining, relaxation, and play, with privacy screening and year-round planting.
Balcony Garden Design: Growing in Containers
Create a thriving balcony garden with smart container choices, wind-resistant plants, vertical systems, and self-watering solutions for high-rise growing.
Corner Lot Garden Design: Two-Sided Curb Appeal
Design a corner lot garden that impresses from both streets. Dual frontage planting, visibility sightlines, wraparound beds, and privacy from two directions.