
How to Survey Your Garden: Measuring and Mapping
Learn how to survey your garden carefully with tape measure techniques, triangulation methods, level recording, sun path mapping, and feature plotting.
How to Survey Your Garden: Measuring and Mapping
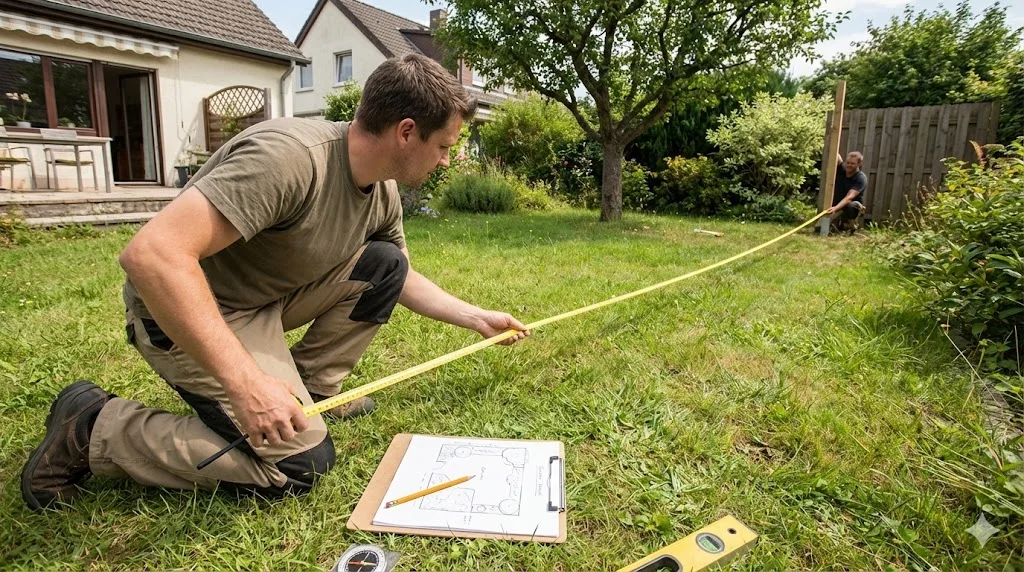
Every great garden design starts with a careful survey. It is the least glamorous step and the most tempting to skip, but without solid measurements, your entire design is built on guesswork. A patio drawn 4 meters wide on a plan that is actually 3.5 meters on the ground will not fit your table. A tree plotted in the wrong position throws off every bed and path around it.
The good news is that surveying a garden does not require expensive equipment or professional training. A long tape measure, a helper, a clipboard, and a couple of hours are all you need. This guide covers the complete process, from measuring boundaries to recording sun patterns. For the full garden design process, see our beginner's guide to designing a garden from scratch.
What You Need
Essential Equipment
- Long tape measure: 30 meters (100 feet) is ideal for most gardens. A builder's tape on a reel is easier to use than a retractable pocket tape for long measurements.
- Shorter tape measure: A standard 5-meter (16-foot) retractable tape for short dimensions
- Clipboard with paper: A3 or tabloid-size paper gives you more room to sketch
- Pencils and eraser: You will make mistakes and adjust
- Compass or compass app: For recording north direction
- Camera or phone: Photograph the garden from multiple angles for reference
Helpful Extras
- A helper: Someone to hold the far end of the tape makes everything faster and more consistent
- Bamboo canes or stakes: Mark reference points on the ground
- String: Create straight reference lines between fixed points
- Spirit level and long straight edge: For recording level changes (optional but useful for sloped gardens)
Step 1: Draw a Rough Sketch
Before measuring anything, walk around your garden and draw a rough sketch of its shape. Include:
- The outline of the house showing doors, windows, and downpipes
- All boundary lines (fences, walls, hedges)
- Existing hard landscape (paths, patios, sheds, greenhouses)
- Existing trees and large shrubs (mark approximate trunk positions)
- Drains, manholes, and utility access points
- Any obvious level changes (steps, slopes, retaining walls)
This sketch does not need to be accurate or to scale -- it is just a framework for recording measurements. Make it large enough that you have room to write numbers next to everything.
Step 2: Measure the House
Start with the house, which is your clearest fixed reference. Measure along the back wall:
- Total length of the wall
- Position and width of each door
- Position and width of each window
- Distance from each corner to the first feature
- Height of the damp-proof course above ground level (this determines the maximum height of adjacent paving)
Record all measurements on your sketch. Use consistent units throughout -- either meters and centimeters or feet and inches, not a mixture.
Step 3: Measure the Boundaries
Measure each boundary in turn. For a simple rectangular garden, measure the length and width. For irregular shapes, break the boundary into straight sections and measure each one.
Running Measurements
The simplest technique for long boundaries is the running measurement. Instead of measuring individual sections, measure the cumulative distance from a fixed starting point to each feature along the boundary:
- From the house corner to the first fence post: 2.4 meters
- From the house corner to the gate: 5.1 meters
- From the house corner to the far corner: 12.8 meters
Running measurements avoid the accumulation of small errors that occur when you chain individual measurements together.
Step 4: Locate Features Using Triangulation
Trees, manholes, and features that are not on a boundary cannot be clearly located with a single measurement. You need triangulation -- measuring the distance from two known points to the feature.
How Triangulation Works
- Choose two fixed reference points that are already on your plan -- for example, two corners of the house
- Measure the distance from each reference point to the feature (the tree, the manhole, the center of a flower bed)
- Record both measurements on your sketch
When you transfer these measurements to your scaled plan, you use a compass (the drawing kind) to draw an arc from each reference point at the measured distance. Where the two arcs intersect is the feature's exact position.
Triangulation sounds complicated but is simple in practice. Choose two reference points that are well separated (not too close together) and that give you an angle close to 90 degrees at the feature being located. This produces the clearest position.
For every tree in the garden, also record:
- Trunk diameter: Measure at chest height (approximately 1.4 meters / 4.5 feet above ground)
- Canopy spread: Estimate the diameter of the branch spread
- Canopy height: Estimate where the lowest branches start
Step 5: Record Levels
If your garden is flat, you can skip this step. If it slopes -- and many gardens do, even subtly -- recording levels is important for drainage planning, patio construction, and retaining wall design.
Simple Level Recording
For gentle slopes, a rough assessment is often sufficient:
- Stand at the highest point and the lowest point and estimate the difference
- Note the direction of the slope
- Identify any sudden changes in level (steps, retaining walls, terraces)
More Precise Leveling
For leveling checks, you need a spirit level and a long straight edge (a straight timber board at least 2 meters / 6 feet long):
- Place the straight edge horizontally from a known level point, using the spirit level to ensure it is perfectly horizontal
- Measure the vertical distance from the far end of the straight edge down to the ground
- This gives you the fall (height difference) over the length of the straight edge
- Repeat across the garden to build up a picture of the topography
Record level differences on your sketch as relative heights (for example, "150 mm below patio level" or "6 inches above the back wall").
Step 6: Map the Sun Path
Sun mapping is critical for plant selection and for positioning seating areas. Visit your garden at three times on a clear day:
- Morning (9-10 AM): Note which areas are in full sun, partial shade, and full shade
- Midday (12-1 PM): Repeat the observation
- Afternoon (4-5 PM): Repeat again
Mark the sunny and shady areas on your sketch using simple shading or color coding. Also note:
- The direction of north (use a compass)
- The position of the sun at each observation time
- Which objects cast significant shadows (the house, trees, neighboring buildings, fences)
If possible, repeat this exercise in different seasons. A garden that is fully sunny in June may be largely shaded in December. The sun's path changes dramatically through the year.
Step 7: Note Existing Conditions
Record everything about the current state of the garden that might affect your design:
- Soil type: Is it clay, sand, loam? (See how to choose the right plants for soil testing guidance)
- Drainage: Are there wet spots that stay damp? Areas where water pools after rain?
- Wind exposure: Which direction do the prevailing winds come from? Are there sheltered spots and exposed spots?
- Views: What can you see from the garden? Are there views to preserve or eyesores to screen?
- Noise: Is there traffic noise, neighbor noise, or other sounds that need addressing?
- Access: Where can you bring materials in? Is there side access or only through the house?
- Services: Where are underground water pipes, gas mains, drainage runs, and electrical cables? Contact utility companies if unsure.
Transferring to a Scaled Plan
With all measurements recorded, transfer them to a scaled plan:
- Choose a scale that fits your garden on your paper (1:50 for small gardens, 1:100 for medium, 1:200 for large)
- Draw the house first, using your measurements
- Add boundaries, using your running measurements
- Locate features using triangulation -- set your compass to the scaled distance from each reference point and draw arcs
- Add trees with their canopy spread
- Add all other features, noting levels and sun patterns
This scaled base plan is the foundation for all your design work. For guidance on what to do with it next, see how to create a garden design plan. You can also transfer your survey into a digital garden planner for structured layout work and three-dimensional visualization.
Common Survey Mistakes
- Measuring from memory: Always measure on site. Estimated measurements are always wrong.
- Mixing units: Use meters throughout or feet throughout. Never mix.
- Forgetting to triangulate: Features located from a single measurement point are approximate at best.
- Ignoring levels: A slope of just 1 in 20 across a 10-meter garden means a 50 cm (20 inch) height difference -- enough to require a retaining wall or stepped levels.
- Surveying only once: Sun, wind, drainage, and noise all change with the seasons. Ideally observe over several months.
Getting Started This Weekend
For the complete garden design process, return to our beginner's guide to designing a garden from scratch.
Garden Design Team
Expert garden designers sharing tips, inspiration, and practical advice for creating beautiful outdoor spaces.
Explore professional garden design
Scapiera is a paid professional garden-design application. See plans for included capabilities and availability.
Join the waitlistRelated articles
Backyard Garden Design: Creating Your Outdoor Sanctuary
Design a backyard that works as an outdoor living space. Zoning for dining, relaxation, and play, with privacy screening and year-round planting.
Balcony Garden Design: Growing in Containers
Create a thriving balcony garden with smart container choices, wind-resistant plants, vertical systems, and self-watering solutions for high-rise growing.
Corner Lot Garden Design: Two-Sided Curb Appeal
Design a corner lot garden that impresses from both streets. Dual frontage planting, visibility sightlines, wraparound beds, and privacy from two directions.